NFT Minter – How do I mint my NFT collection?
Ready to launch your NFT collection to your community? Perhaps, you are stuck on how the process goes? In this article, I will explain how to use our NFT Minter.
Newcomers often assume “OpenSea” when thinking about where to buy an NFT. However, there is somewhat of an inside secret: NFTs have to be minted to the blockchain prior to ending up on these marketplaces. Often, you will hear these marketplaces referred to as “secondary marketplaces”.
Why? There was a primary sales phase! See, think about the cost of most blockchain related transactions. They’re not typically overwhelming. Imagine paying the fee for 1,000-,10,000 separate transactions? If you are minting an NFT collection with a large amount of NFTs, you would likely not want to pay such an overwhelming fee. Thus, a minting process called “lazy minting” was created.
How does the NFT minting process work? Lazy Minting explained:
Instead of launching 10,000 NFTs straight to a secondary marketplace, the buyer mints the NFT directly from the artists website. This is called Lazy minting. Lazy minting allows the brand or artists to launch a massive NFT collection, without having to pay any transaction fees for each particular NFT itself. The fee is passed along to the user who is minting the NFT. The brand or artist also charges a “mint fee”. The mint fee is the fee in which the artist or brand receives for selling the minting right (per NFT) to their customers. After the NFT has been minted to the blockchain, the user may decide to hold the asset, or post it for sale on a secondary marketplace.
For a further look into this minting process, I will explain several other components successful brands and artists use to launch their NFT collections:
NFT Whitelisting & Presales
Often, brands and artists will use a presale to incentivize them build up their community. They will offer whitelist spots to users whom are able to participate in challenges, drive social media follows, discord joins, make videos, and post blog content about their NFT collection. Those whom participate are rewarded a “whitelist spot”, enabling them access to the presale mint process. This means, after the presale mint starts on the brands or artists website, only the users in which are whitelisted will be able to mint their NFTs. Typically, presales are discounted, providing the whitelisted users an even greater incentive to participate in building your community.
NFT Reveals & Pre-reveal
NFT Pre-reveals work somewhat of the same to a standard mint process. The difference is that the users who mint their NFTs from the brands or artists website, will not know what they minted for a certain duration of time. Typically, the NFT is revealed after a week or so. Instead of minting the NFT and immediately knowing what your NFT is, you have an image and basic metadata that applies to all of the NFTs within the collection. The team running the mint will announce a time in which the NFTs will be revealed.
Typically, this process encourages the community engagement to increase rapidly as everybody is kept waiting in excitement on what their NFT will be. Users who miss out on the initial mint may then grab one of the NFTs on a secondary marketplace prior to the reveal.
NFT Airdrops
An NFT airdrop is a process where NFTs are sent to addresses at no cost of the receiver. Airdrops are often used as rewards for holders of a previous NFT drop, or even giveaways to increase their community size.
How do I mint my NFT collection to the blockchain?
Here at Generate NFT Online, we provide NFT tools for artists and brands worldwide. We offer every tool you need to successfully launch your NFT collection to your community.
If you have not yet generated your NFT collection, you will need to do so prior to minting your collection. To get started, read our article below:
NFT Generator – Generate your NFT Collection here
After you have generated your NFT collection, proceed to the minting process with our NFT minter.
NFT Minter – How does it work?
Creating your NFT mint with our NFT minter is a seamless process that requires absolutely no coding.
Our NFT Minter offers the following features:
- Lazy minting (from your website, or our hosted pages)
- Presales & Whitelisting
- Pre-reveals
- Mint management
- Embeddable mint button
- Hosted mint web pages
To get started, signup for free via the link below and navigate to “NFT Minter”:
NFT Minter – Mint your NFT Collection here
Intro:
Navigate to the NFT Minter and click “Ethereum & Polygon Minter”. From here, choose your network. We highly recommend giving this a test on a test network first, to ensure you understand the process. Now, simply choose your contract. Lazy minting, the base contract, provides only basic functionality. This contract will be the cost effective in terms of transaction fees. Lazy Minting + Reveal offers the pre-reveal functionality we talked about above. Our Lazy minting + Presale contract offers the presale ability as well as whitelisting for the presale. Lastly, lazy minting + presale + reveal later offers the functionality of each of the previous contracts.
Note: There is a 3.9% commission fee on all initial mint sales
Step 1)
After clicking continue, you will be on the step one page:
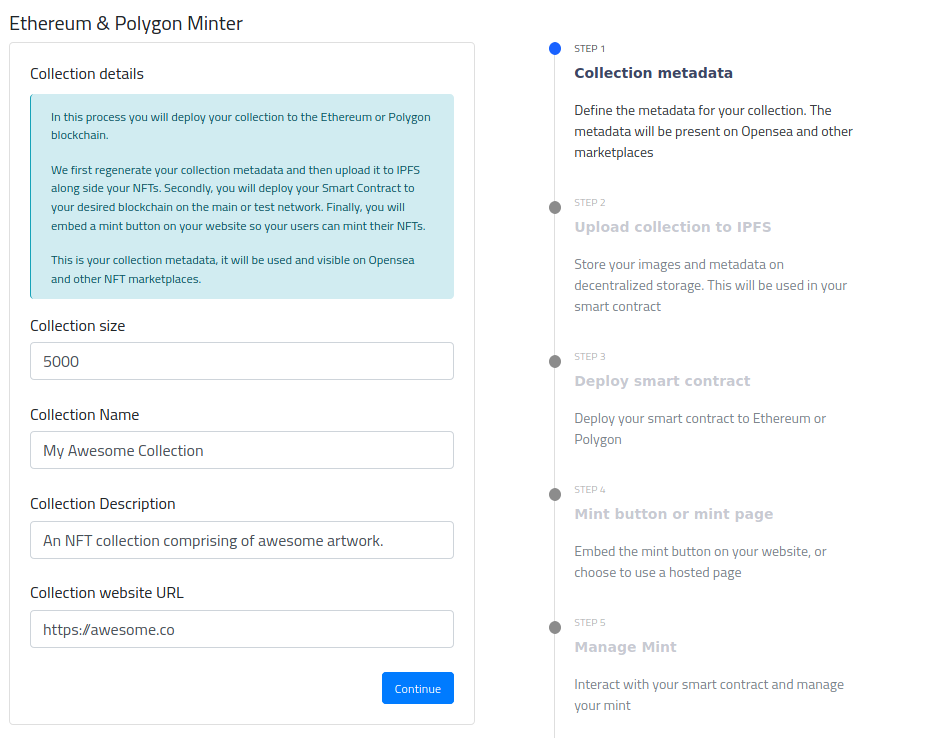
From here, fill out your collection size, collection name, description, and your website URL (if you have one), then click “Continue”
Step 2)
Step two may be the most complex step, yet, it should only take you a few minutes. Here, you will fill out your image & metadata IPFS CID URLs:
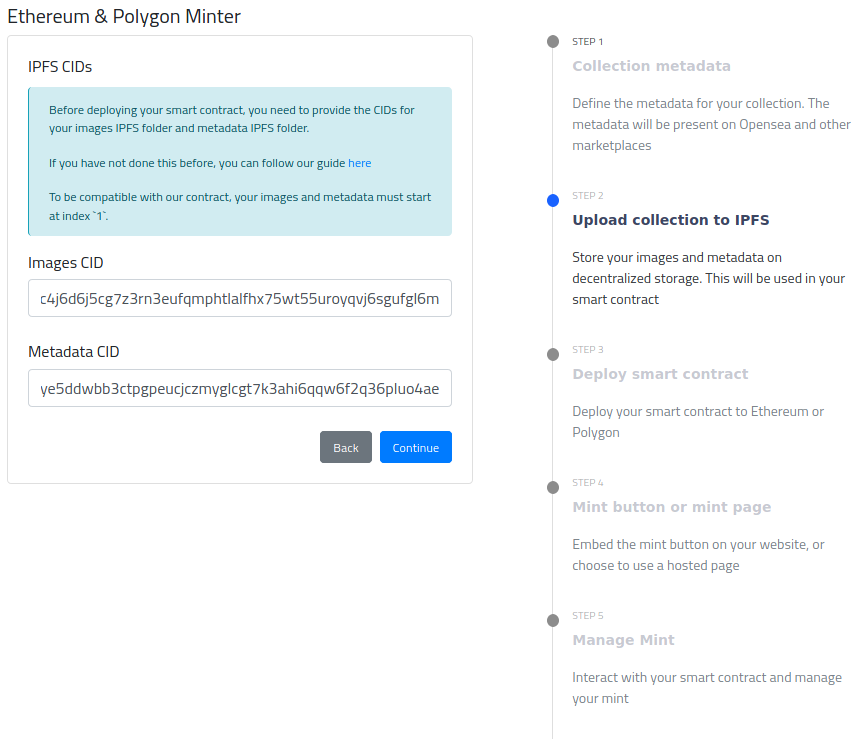
As the tooltip on this page says:
Before deploying your smart contract, you need to provide the CIDs for your images IPFS folder and metadata IPFS folder.
To be compatible with our contract, your images and metadata must start at index1.
Assuming you have generated your NFT collection with our NFT Generator, your index will start at “1”.
Step 2.1 – Convert your art folder
After you have downloaded your NFT collection, proceed to extracting the zip file. After extraction, you will have an “art” folder and a “metadata” folder.
We will now need to convert the “art” folder to a “car” file (content addressed archive)
Go to car.ipfs.io, click “Open File Picker” and select all of the files within the “art” folder. Now, scroll down and click “Download”
Step 2.2 – Upload your art folder
Below are some recommended IPFS file hosting services. Go and signup at one of the services, and proceed to upload your car file that you generated in the previous step.
Once you upload your car file, you will receive an “IPFS CID”. Save this CID string somewhere, you will need it in the next step
- nft.storage (free)
- pinata.cloud (paid)
Step 2.3 – Regenerate your metadata
Go to generate-nft.online/dashboard/metadata-editor, click “select file” and choose the file named “metadata.json” within your metadata folder. Your collection name and description should appear. In the “Image URL Prefix” box, enter the following information:ipfs://CID_FROM_STEP_2/ (ensure to add the ending “/”), and click “Regenerate”
Step 2.4 – Upload your metadata
Repeat Step 2.1 from this article, using all of the metadata files that you regenerated in the previous step.
Now, repeat Step 2.2, using your metadata car, ensuring to save the metadata CID
Step 2.5 – Smart Contract
Return to the NFT Minter and proceed to creating a mint.
On Step 2 of the minting process, enter your CIDs that you acquired from the previous steps.
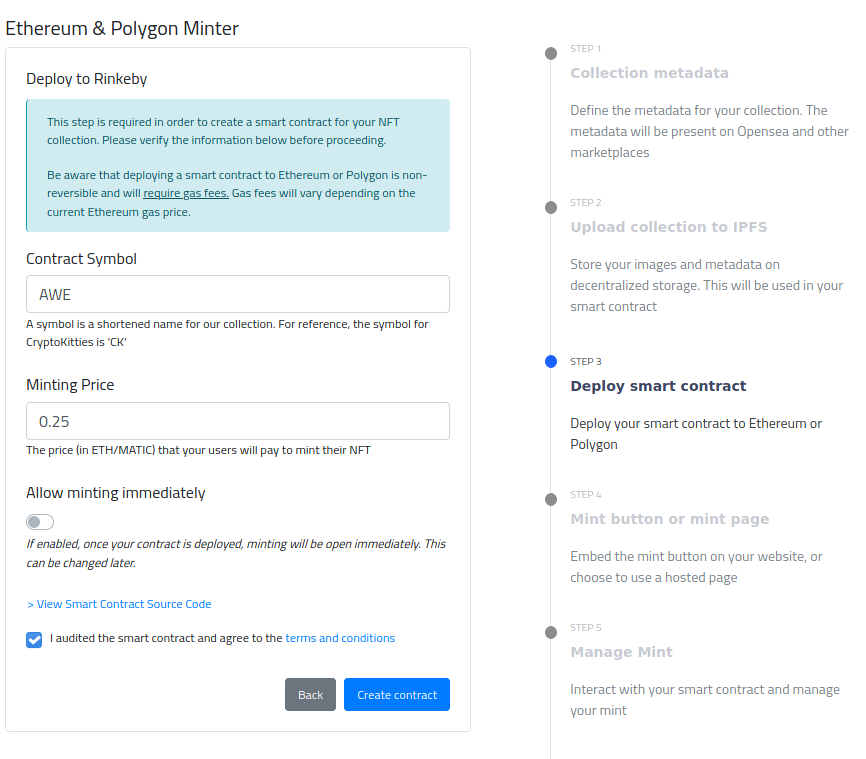
Step 3)
Here you will configure your contract symbol. A symbol is a shortened name for our collection. For reference, the symbol for CryptoKitties is ‘CK’.
Set your minting price, the amount each user will pay (+transaction fees) to mint each NFT. You may also choose to allow minting immediately. If you do not want your users to be able to mint right away, you may keep this disabled and enable it later.
From there, ensure to check out the smart contract source code and agree to the terms of service. Then, click “Create Contract”. Now, you will receive a prompt by Metamask to deploy the contract to your chosen network. Click “Confirm”
Step 4)
On step four, you are provided with your mint button embed code. Don’t have a website? No problem! You may use our hosted pages. If you choose to use your hosted pages, skip this step for now. If you do have your own website, continue!
You may customize your button color and buttons text color on this step. From there, ensure to copy your code and place it onto your webpage. Insert the <script></script> within the <head></head> tags, and place the div block (GNOMintButton) within the <body></body> tags somewhere.
Continue!
Step 5) NFT Mint Management
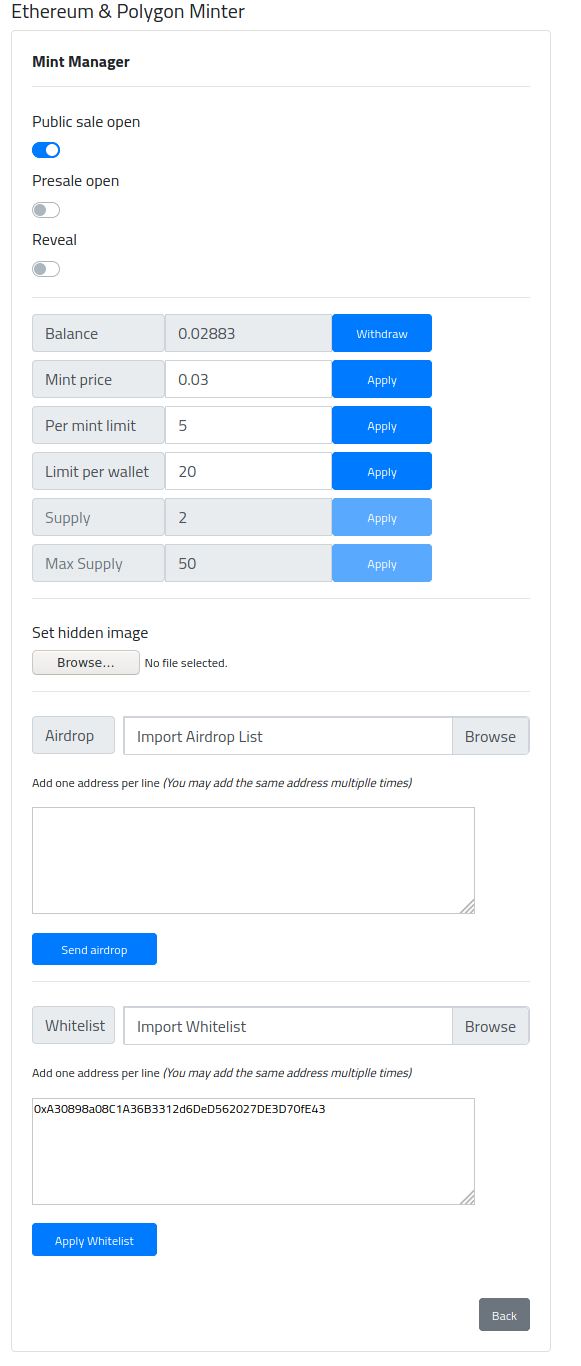
This page is your management page, you may come back to this page at any time to manage your mint. Here, you have the ability to:
- Open/close your sale
- Open/close your presale
- Reveal your NFT
- Withdraw earnings from Mints
- Set mint price
- Set per mint limit (how many NFTs can be minted per transaction)
- Set per wallet limit (how many NFTs can be minted to one particular wallet)
- Set your hidden image (your pre-reveal image)
- Airdrop addresses (send NFTs for free to a list of addresses)
- Whitelist addresses (allow users to participate in your presale)
Want to setup an NFT website for your mint? Read the following article: